Sunday, November 17, 2013

Chanterellicious Part 3: Wild Mushroom and Butternut squash Risotto


So we are finally done with all the prep work and ready to make something delicious with our harvest. Here is a recipe from a good friend of mine. She cooked this up for us over a few glasses of red wine (I would recommend the wine, this recipe takes a while) after a long day of mushroom hunting using some of the days harvest. This was probably one of the best mushroom dishes I have ever had so it is certainly worth the time.


Wild Mushroom and Butternut squash Risotto


- 3 diced shallots
- 2 cups butternut squash cut into 1 in cubes
- 1 – 2 Tbsp butter
- 2 cups of wild mushrooms
- 2 – 3 bay leaves
- 1 cup Arborio rice
- ½ cup of white wine
- 5 cups of chicken broth
- 1 cup grated Parmesan cheese
- Salt and pepper to taste
In a separate pot keep the chicken broth warm on low heat

Dry sauté mushrooms if using very fresh mushrooms or delicate mushrooms with high water content such as Chanterelles and set aside

In a large pot, brown squash and pepper in butter for 5 – 10 minutes or until slightly caramelized

Add mushrooms (If using a softer variety that you dry sauté ahead of time, add the mushrooms a bit later) and shallots and fry until shallots sweat and start to become translucent

Add the rice and stir to coat with butter and add the wine and bay leaves. Let the wine deglaze for a few minutes, stirring constantly.
Using a ladle scoop about 1 cup of broth into the rice mixture and stir. Stir frequently (every 30 seconds or so) until the rice absorbs the broth enough for it to have a thick gravy-like consistency.

 Add a bit more broth and repeat until the rice is cooked and the risotto has a creamy consistency (you may or may not use all the broth). If you are using softer mushrooms and still haven’t added them, add them when you have mixed in about half the broth.


Remove from heat and stir in grated Parmesan. Add salt and additional pepper to taste.

Serve with freshly chopped parsley to garnish and the rest of your bottle of wine.
Hope that recipe makes sense for everyone, Sorry there are not more pictures, I was a little distracted with the chatting and red wine to snap anymore. My next few recipes will be a little more image friendly.
Until next time, happy cooking
- Katy

Tuesday, November 12, 2013

Chanterellicious Part 2 - Preparing and Storing


Alright, so let’s just get right back into our discussion about those lovely little orange forest dwellers.

Today I would like to talk about what to do once you have yourself a little basket full. Chanterelles are great mushrooms because they are usually free of maggots and store very well. I have left chanterelles in my fridge for up to two weeks and they have still been great to use.  If you want to keep them longer then that is also possible, although not in your fridge.

Let’s start off with what to do as soon as you get back. With a bit of luck while you were out gathering you had the foresight to carry a little brush with you and cleaned each mushroom before popping it into your basket. This is the best way to clean them if they are relatively dry when you are harvesting. If you brush them off well and cut, rather then pull, then your mushrooms are basically ready to eat as soon as you get home.

 ( The black stringy things are licorice fern root, we will touch on those in another post)

If you're more of an impulsive mushroom hunter who runs manic in the forest snatching up little orange caps and squirreling them, covered in debris, into bags or backpacks you will have a little more work to do. I really would recommend the brush and basket method, I have spent many a long nights washing or brushing dirty broken mushrooms into an edible state, occasionally giving up and deciding that pine nettles really don’t taste that bad.

If you have made the mistake of bringing home dirty mushrooms you can either brush or wash them.

Brushing will keep them dry and firm but will not get all the dirt off, which, once cooked, isn’t really an issue.

Washing them will get them very clean but chanterelles tend to suck up water like a sponge and if you try to cook them after this you will be disappointed to find mushroom mush instead of cute little mushroom slices.

I have a friend who swears by washing and them leaving out overnight, with a towel underneath, to dry up. Don’t leave them longer then a night out however or they may start to rot. Once they have sat out for a while (a few hours to overnight will work) place them in a paper bag in the fridge. They will slowly dry out this way over several days.

Photo courtesy of Tash
If you would like to use your soggy mushrooms right away (this method also works if you have gathered your mushrooms in the rain) I would recommend dry sautéing them before using them in whatever recipe.

Dry sautéing is something almost anyone who has a basic idea of the workings of a stove can accomplish. Simply cut your mushrooms into slices and throw in a pan on high heat with no oil. Stir the mushrooms occasionally and you will find they quickly release all the stored up water, filling the pan with a lovely mushroom stock (which you can collect and use in soup).  Drain the pan as it fills with water, keeping the water if you wish to use it and place the mushrooms back on the stove. They are done when they are no longer releasing water. Usually I find they are done after I drain water the first time.
You can see the liquid released by the mushrooms in this photo.
Here is the liquid collected from dry sautéing, I like to keep it to use as a mushroom stock in soups.

Once you have dry sautéed chanterelles you can freeze them for use later or use them in any recipe, including soups and they will keep their form. I always dry sauté my mushrooms before cooking with them even if they seem quite dry. If you find they are releasing no water then you can take them off the stove and use however you like.  The dry sauté and freeze method is how I usually store my chanterelles.


I also freeze young dry firm chanterelles(pictured above). If they are firm and dry enough they will hold their form when defrosting and can be cut up and used as normal whatever time of year you get to them. I have heard of drying and canning chanterelles but I have not experimented with this myself so can only recommend the dry sautéing and freezing or just freezing method.

These two methods are certainly the easiest quickest methods to preserving your autumn harvest in a form that can be easily used later on. To use simply defrost and toss them in whatever recipe you desire, chopping them up if they have been frozen whole and raw.
So that covers the basics of my methods of preparing and storing mushrooms. Next time we will start getting into what to do with these tasty caps you have so lovingly collected, prepared and stored.
Until then, happy hunting!
- Katy

Sunday, November 10, 2013

Chanterellicious Part 1 - Identification and Collection


Alright guys so the next few posts will be a mini series following everyone's favorite common wild mushroom, the Chanterelle (Cantharellus cibarius)! Today's post will cover chanterelle identification and habitat while the next few posts will cover preparation, storage, and recipes.

So let’s just get right into it. Here is a chanterelle:


Things to take note of are the peachy orange colours (although white chanterelles are also common in the pacific northwest) the wavy margins of the cap and the thick fold-like, forked gills which run down the stipe (stem). Other mushrooms can have forked gills but the blunt fold like quality of the gills is specific to members of the chanterelle family.  The smell is also a good ID characteristic, it should smell fruity and earthy. Many people describe the smell as apricot like.


This next picture is a white chanterelle(Cantharellus subalbidus), also edible and delicious. I find white chanterelles tend to be a bit larger and thicker then the normal orange chanterelles. This picture, while not the best photograph does show the blunt fold like gills.
This next picture is also a species from the chanterelle family, the Scaly chanterelle (Gomphus floccosus). This species causes gastrointestical distress but will not kill you or cause any permanent damage. It is very easy to tell apart from the normal chanterelle.

The most distinctive characteristic of this mushroom is its scaly bright orange cap. A true chanterelle can have the occasional scale on its cap, but not many. The Scaly chanterelle is usually bright orange on top and off-white underneath, whereas your normal chanterelle is more uniformly coloured. The Scaly chanterelle is also usually larger and firmer than the true chanterelle. It is funnel shaped with a dip in the centre of the cap and a less wavy margin. The mushrooms on either side of my hand are also smaller Scaly chanterelles.
Here is another troublesome look-a-like. This is the aptly named false chanterelle. The first time I came upon one of these I thought it was some sort of weird chanterelle looking mushroom but definitely not the same species. It is easy to tell that it is not a chanterelle because while its gills can be forked it has true, blade like gills. I find this mushroom is also daintier then the true chanterelle.
When combing the forest it is easy to go after one of these thinking you have struck chanterelle gold, only to be disappointed when you flip over the cap and find true gills, not blunt folds staring you down. This mushroom is often found growing on dead wood or soil rich in decaying wood, whereas a  true Chanterelles only grows on the ground where they form mycorrhizal (symbiotic) connections with nearby trees.
This photo is not one of mine, but I felt it necessary to show a better image of the blade like gills this mushroom has (my photo was too blurry). You may also notice the stipe is usually thinner and the gills don’t run as far down the stipe. These mushrooms will also cause gastrointestinal distress but will not kill you or cause permanent damage.
So let’s get into habitat. Now I have heard you can find chanterelles growing just about anywhere there are trees it can form a relationship with, but in my experience I have found they like a very specific (but luckily common) habitat here in the Pacific Northwest.  I usually find chanterelles growing beneath evergreen (commonly Douglas fir) trees with mossy forest floors and usually near or directly under Salal bushes. The best habitats are in open forestland but this is more for your benefit then the mushroom’s. I have found Chanterelles growing in huge Salal thickets, but who really wants to gather them out of such thick (usually wet) places. Here they are growing in the perfect habitat, open mossy forest under salal and douglas fir trees.


The white chanterelle can be a little more tricky as it likes to hide under the moss. Usually all you see is a little dot of white poking up through the moss.
If you gently pull back the moss often you will find a lot more then you bargained for. I have found up to 20 white chanterelles from a single easy to miss white spot poking up through the moss. Just be sure if you use this technique to place the moss back as you found it and give it a little push to cement it back to the forest floor.  


This patch yielded about 10 chanterelles, although I forgot to take a picture after harvesting them all.
 
Two things to be aware of before we finish here is that if you decide to go chanterelle hunting please note that chanterelles will often bloom in the same spot year after year, so once you have found a patch remember where it is and you could be eating well for years to come. Secondly if you cut instead of pull chanterelles when you harvest them then you can come back to the same spot multiple times in a season to re-harvest. Once the base of the stipe (where it gets fuzzy with bits of debris growing into it) is pulled from the ground that mushroom will not regrow until the next year so I would recommend always cutting, even if you have no plans to revisit a site, as a common courtesy to your fellow mushroom hunters.
In closing I would like to remind everyone to be careful when gathering wild mushrooms, while most mushrooms will do no more then give you a stomach-ache some can kill you and therefore you should always double check your harvest with an expert before consuming it.
Until next time! Happy Hunting
- Katy


Thursday, October 17, 2013

Treasure hunting


The forests are blooming right now like crazy! every time I go into an ethereal woodland, or even peak into little green strips between houses and roads I see them. Bright reds, purples and yellows, glowing whites, violets, shy gray and browns. Not flowers of course, it is far to late in the year for many of those, but the mushrooms!

I figured today I would share some of my shroomy photography. Mushrooms make lovely subjects for photography, but identification can be very challenging. I will share with you the names of those I am sure of, and for those I am not, I welcome your input. :)
Witch's Butter (Tremella mesenterica) - apparently edible, although I have no interest in trying it.

Fat jacks (Suillus ssp.) - edible but usually maggoty.

Unknown species.

Some type of Polypore, also known as Conks. many of these species have medicinal uses, although they are usually too woody to just eat.

Unknown.
Another Polypore, perhaps a young Red-belted Conk (Fomitopsis pinicola)

 Unknown, growing with that orientation on dead wood.

 Unknown, at first I thought perhaps a Blewit due to the colour, but Blewits don't have a veil (the cottony stuff covering the gills). in real life this mushroom almost glowed violet.
 A Milkcap species, perhaps Lactarius kauffmanii.


Unknown species with violet gills. These poor mushrooms barely had a chance, their veils haven't even opened yet and they were already full of maggots.
Artist's Conk (Ganoderma applanatum). You can see how this fungi gets it's name, the lightest scratch leaves a dark brown stain.

Ramaria species, also known as a Coral mushroom. This genus is extremely hard to tell apart, some species are edible, and some mildly poisonous. unless you have a lot of spare time and a microscope I wouldn't recommend sampling these.

Sulfur tuft (Hypholoma fasciculare). a beautiful poisonous species, growing in clusters on deadwood. The almost neon yellow gills give this species away.

Unknown species on dead wood

Mycena aurantiidisca, these caps seem to almost glow.
Some of the craziest lichen I have seen, surrounded by broad-leafed star flower (Trientalis latifolia)

 Unknown species with a very similar pattern to beef...at first I thought the Beefsteak Fungus (Fistulina hepatica) because of the patterning on the inside, but that species is tougher, redder and has a sponge layer instead of gills.


 More beautiful Ramaria

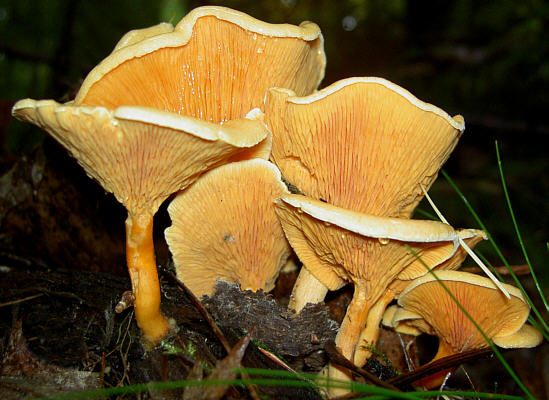
Everyone's second favorite wild mushroom, the Chanterelle! (Cantharellus cibarius). we all know the most favorite is the pine mushroom (Tricholoma magnivelare)
 Here's one of watch out for! The Scaly Chanterelle (Gomphus floccosus)! This species is in the same family as your normal Chanterelles but it is poisonous. While it won't kill you it will certainly make you sorry you crossed it's path. Look for the typical funnel shape and scaly cap to ID it. I find it is usually darker orange on top and almost white yellow underneath. A normal Chanterelle is uniformly coloured.

This is a terrible picture, but I wanted to share these mushrooms. these are Black Elfin Saddles (Helvella lacunosa). this mushroom is poisonous raw, but edible cooked. I have only eaten this species once, boiled and then sauteed, to make sure it was cooked thoroughly. 

 Tricholomopsis decora. beautiful but poisonous species. grows on dead wood.
 One of the weirdest species out there, The Bleeding Hydnellum (Hydnellum peckii). easy to ID, but not edible.

I found some non-mushroomy friends too, I think this is a Red-legged Frog. He was very well behaved for the photograph. Although a native species that I would not recommend eating, if you were in a survival situation he might be pretty good cooked over a fire...

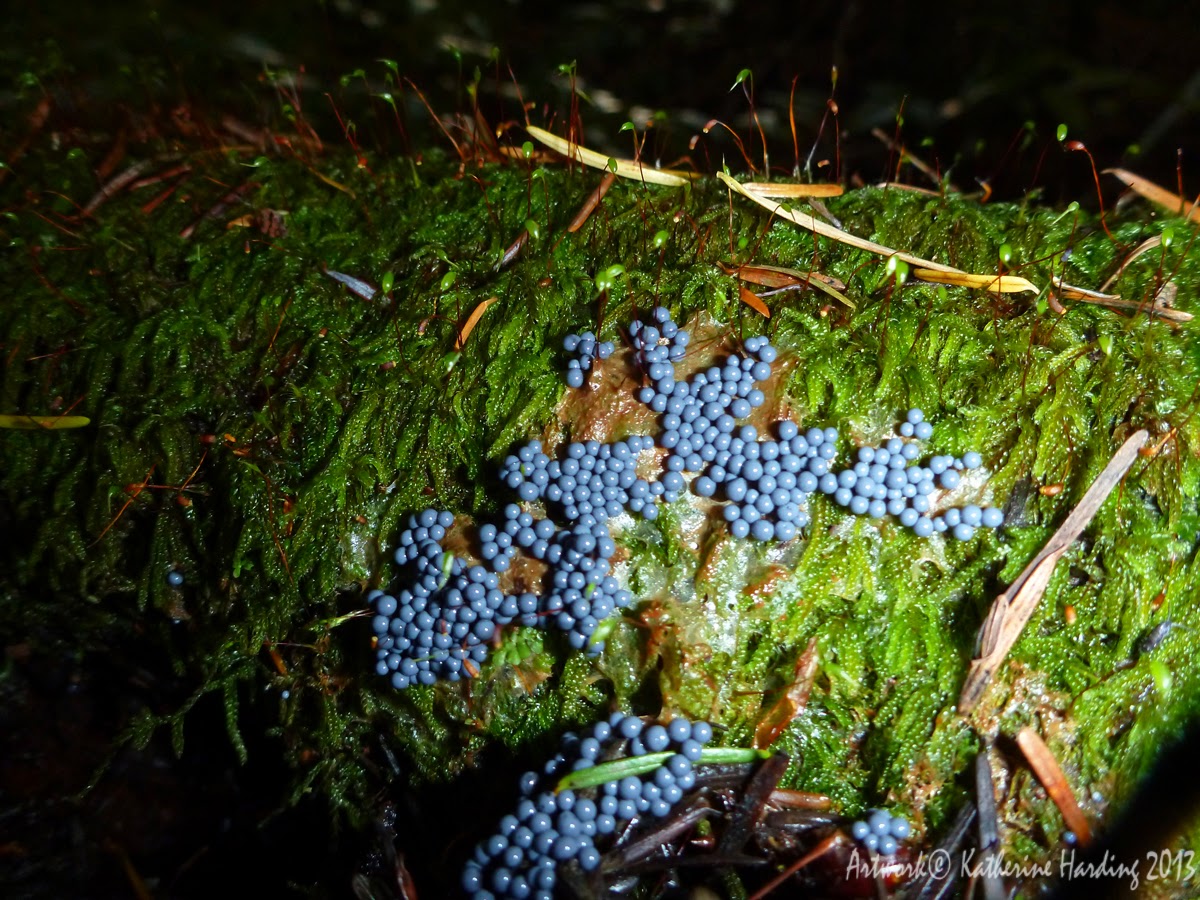
 This totally stumped me, strange bluey purple balls, easy to squish, growing on a dead log.


 Here's something to watch out for! an Amanita! This family contains some of the most poisonous mushrooms around, they could kill you. They also smell great, look beautiful and apparently taste delicious. To avoid these look for pale gills, white spores, a universal veil which becomes a volva at the base of the stem and usually a ring on the stem. When trying to ID a species of mushroom it is very important to dig down to the bottom of the mushroom to check for a volva. If one is present you probably have an Amanita and you should handle with care.

On that dark note, see you all next time!

- Katy


Wednesday, October 2, 2013

Fun with Rosehips

Alright so today I have something delicious to share!

 For those of you with a little experience in wild foods you probably know that rose hips are edible and extremely good for you. For those of you that don't, welcome to the know. All rose hips are edible; those little bright red berries in the forest, the huge juicy round things on ornamental 'wild' roses, and those beautiful oval orbs you prune off your prized roses each autumn.
I've heard people say that one has the same amount of vitamin C as a entire orange and will keep you from getting scurvy if you find yourself living out in the woods in the winter (they are usually best after a hard frost).
The problem is that they have such a small amount of flesh, and most rose hips are quite bitter and pithy. Last year when flipping through one of my wildfood books I stumbled upon a recipe for rose hip syrup. I am always trying to find the most delicious and healthiest sweeter so I gave it a try.
It turned out to be, hands down, one of the best wild food creations I have tried. I think it gives maple syrup a run for its money.
So today I'll share with you my recipe, if you call it a recipe. I'm more of a 'add a little of this and a little of that' kind of cook then the 'stick to the books and measure it out' type, but here we go.
 Alright, here are my very dirty, but delicious, massive rose hips. The bigger and sweeter the better, but you can make it work with any type.
 So I gave them a clean, pulled off the bits of stem and spent flowers, but I didn't bother removing the seeds. I then add just enough water to cover them, be sure to push down the hips to check the water level as they tend to float. Then turn the stove up enough to send them into a good simmer and go relax with a book. I usually leave them for 30 min  to 1 hr, depending how fast they cook up.
 When the rose hips are soft and just starting to come apart, strain them. Be sure to keep the juice that strains out, that's the most important part! For now just set the juice aside. If they have been cooking long enough the juice should be an semi opaque orangey liquid.
Put the rose hips back in the pot, with the same amount of water as last time and simmer again at the same temperature. This time cook them until they completely come apart into a mush, usually 1 to 2 hours.
 Again strain the mush, and press it to extract any extra liquid. I usually compost the seeds and mush after this step, although I plan on figuring out a good use for it. In the mean time it makes mean compost.
 After that you are left with the juice from the two extractions, combine these and set to simmer on the stove. Simmer until desired consistency, adding honey (I use unpasteurized wildflower honey, but I don't think it matters much) until desired sweetness. I know those are very vague instructions, but that is how I make it. I think the original recipe called from equal amounts white sugar to rose juice but I would estimate I only add 1/2 to 2/3 honey to rose hip juice. I usually boil it down until it is the consistency of maple syrup and I am satisfied with the taste.
 It can be stored in the fridge for up to two weeks (could be longer, I'll have to experiment) or frozen for a year. I have never tried canning it, but I'd imagine that would probably work.

While crepes are the go to companion with this syrup here is a different use for it: rose hip syrup drizzled on baguette with cottage cheese:

Bon Appetit!

- Katy